Ok, I've got to post about this. I've just figured out a solution to a horrible problem that I've always had in Toonboom. It's got to do with the onion skinning feature. Here it is; in Toonboom the onion skinning feature is frustrating as hell since the previous and next frames look like green or red fills when you have a fully painted rig. This can be nearly useless when you need functioning onion skin. Behold:
Ok, it's not SO bad for something as simple as the above example, but when you want to make sure your arcs are working between poses; you're effed. Also, when you want to set pivot points on layers that are behind the top layers, you can forget about that without the run around of hiding/locking top layers after you hunt for them in the timeline. Now... look what I've done here:
Say whaaaaat, right?? It's witchcraft. You can now see through the painted model just as you can with the onion skinning feature in Flash.

So all I've done here, it's really easy I promise, is make a clone palette of the one currently in place. To do this, select the palette to be cloned in the colour view. Then in the colour view menu select Palettes > Clone.
Then name your new cloned palette. Make it clear and easy to remember.
So now you just need to take the transparency way down on the fills in the new palette. I made my fills %25.

*This is also a perfect way to create new palettes for your painted character rig, such as a night time palette!

*If there is more than one palette loaded, the system will use the one highest in the palette list.

Magical!
Posted
AuthorAndrea K Haid
I had a recent question over Twitter from John Lechner about workflow in Toonboom. He was interested in learning about my workflow in Toonboom and curious if I use the XSheet. I actually have never used the XSheet (also known as the Exposure Sheet or Dope Sheet) in Toonboom. This is because it hasn't yet been necessary for the work I've done in Toonboom. For someone sitting down to do hand drawn animation on paper, a representation of what is happening over time in front of them is very valuable. But when using Flash or Toonboom, the animatic/leica, the soundtrack and the timeline serve the time tracking needs of a digital animator. Actually, these days when I animate on paper I will have some kind of animatic and/or xsheet system going in Flash and/or Premiere and After Effects. I put my animatics together digitally so that I can watch and respond to their timing. Ultimately I will be "going digital" by scanning all my drawings and importing them into some editing software anyway so the digital exposure sheet system works for me.

*Don't forget to check out my previous Toonboom tips; How to Animate Pivot Points, Symbols vs Drawings vs Pegs, and Symbols in Flash vs Drawings in Toonboom.

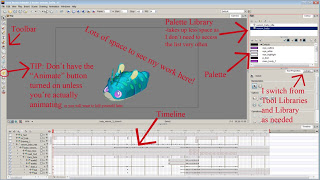
Here is how I set up my copy of Toonboom for animation:
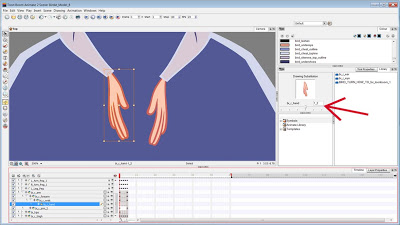
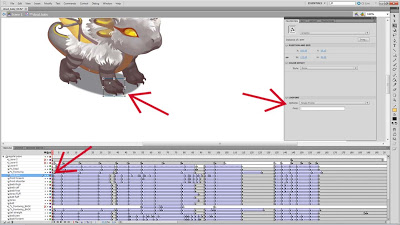
I always have the palette list, palette and Libraries open. I switch from the Tool Library and Library frequently as needed. The palette portion doesn't take up a heck of a lot of space. I like to have lots of breathing room on the stage to animate. I've had the luxury of dual monitors in the past and in that case would let the timeline have a whole monitor dedicated to it. Now that I work with fussy Cintiqs that won't let dual monitors function I keep everything on one monitor. I'll make the timeline take up more or less space depending on what I need to see at a given moment.

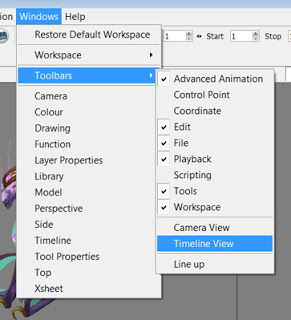
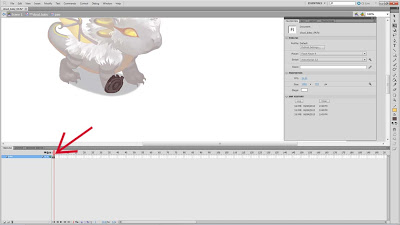
If I was editing the Xsheet, here is the single monitor layout I would use:
I think that Toonboom implemented the Xsheet for hand drawn animators moving into using Toonboom to let them feel at home. There are a few cool tricks that you can get going with this digital Xsheet however and I have known animators that find it a helpful visual representation of their scene and a way to organize their drawings. I have a feeling that the Xsheet would come in handy in a studio environment when directors want to leave notes or the organization of scenes is critical to a smooth studio function.

The Timeline vs the Xsheet:
The timeline is a horizontal representation of your scene over time. There are layers down the left and frame numbers across. The playhead can be moved across the timeline to adjust what frame you are at.

The Exposure Sheet is quite similar! It's a vertical column. There is a vertical column to coincide with each layer and they will share the same names. You can still use shortcuts to go forward and backward as well as to the next and previous drawing, just as you can in the timeline.


Timeline/Xsheet Shortcuts: (Keep in mind that I'm using the Flash shortcuts set!)
go forward a frame: . (the period key!) *TIP* I tend to think of this key as the > key since it looks like a forward pointing arrow! This just lets me remember the shortcut super easily. However to actually use the > key you would need to press shift. Don't do that as you just need the period.)
go back a frame: ,
go to next drawing: G
go to previous drawing: F
go to first frame: home (this is < in Toonboom shortcuts)
go to last frame: end (this is > in Toonboom shortcuts)

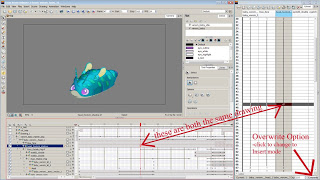
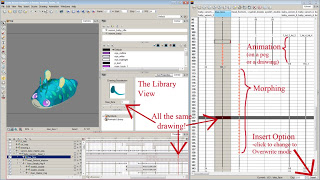
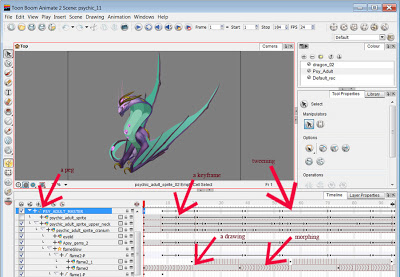
Anything you do in time line will show in xsheet! Here you can see a visual example of how a drawing in the timeline, library and xsheet are all the same numbered drawing. And the morphing on the timeline is visible in red on the xsheet:

So.

Why use the Xsheet?

I would say that it's up to you whether you do or not. It's probably going to come in handy if you are handing scenes to someone else and want to leave notes/timing suggestions, or if it makes you feel more organised or comfortable with your scene.

When you are using the xsheet, you can actually SEE what's in a frame. By default frames are numbered, for example frame one is drawing one. The second drawing in a drawing layer will be 2. This can actually get confusing. You'll see how Toonboom numbers drawings as you get using it and creating drawings.

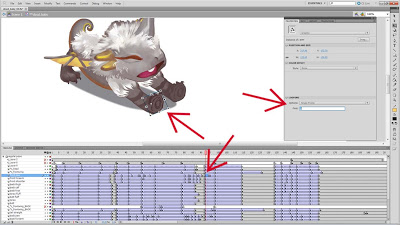
There is something in the time line called Data View.
You can turn this option on and off by hitting the double arrow button on the top right of the box that has the layer information.

You can use this Data View to change which drawing is exposed on the timeline the same way that you can in the xsheet. Just click the current frame number and type in the drawing number you want to show, or hover over the current frame number and click + drag right or left to scroll through the library.

Back to the Xsheet!
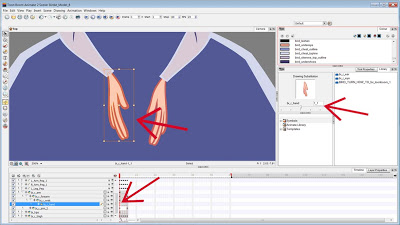
In the xsheet, you can select drawings. There are 3 areas that you can adjust in these cels. On the left side of a given cel, if you hover you cursor, is a plus sign. On the right side, hover and you will see and up/down arrow. Use the center of a cel to select it. You can double click the center of a cel to enter a new frame number, just as I mentioned you can do in the Data View section of the timeline. What do these functions do? On a drawing, on the left side, click and drag a drawing to move it. On the right side, click and drag to extend it's exposure. You should really give this a try to see the difference for yourself. By default if you drag a frame it will overwrite ones that is is dropped on.

You can easily swap drawings in the xsheet.
To do this just double click the center of a cel and type i the number of the drawing you want to be there. The way I do this without the xsheet is I select the frame on the timeline where I want a different frame to be, then I scroll through the library to find the drawing I want. This can be tricky and time consuming when there are a lot of drawings to scroll through. I tend to appreciate the visual representation. If you are working on say, a TV show and you are using a character with multiple parts such as a selection of hands or mouths, memorising the drawing number of those parts and then typing in the drawing number on the xsheet or data view can seriously be a timesaver! So I can totally understand that being a benefit.

When you switch a frame in the xsheet, it only switches that frame! This is kinda crazy since it's a different story in the timeline. In the timeline if you switch a drawing it will remain exposed until the next drawing. You could totally use all these tools to your advantage.

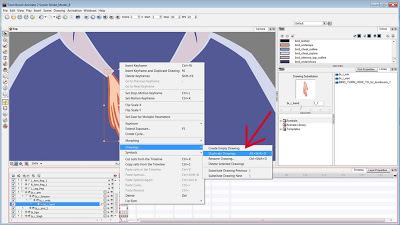
When you rename a drawing it will be renamed in the file system. If you have drawing "4" and rename it to "hand", then all the previously named "4"s will now be called "hand"! Nifty stuff. Keep in mind that if you do that, the 4th drawing in the library will now be empty. This could be super useful for doing lipsync.

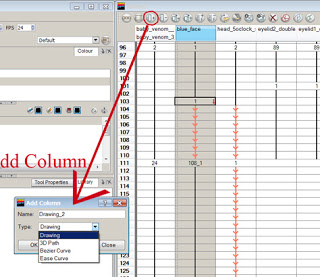
Now pay attention. There is the ability in the columns of the xsheet to use different types of columns.
Now if you have Toonboom Pro (I don't), then you can add a column type called annotations. This feature is possibly the biggest argument for the xsheet. But if you don't have Pro you can't use it. What annotations does is give you a blank column that you can actually DRAW in! You can doodle reference images, write notes about timing and lipsync and even erase this and leave typed notes for the animator or artist you pass your scene to. Pretty sweet stuff. You can move these frames too!

To add a columns, hit the third button over from the left that is a tall rectangle with a plus sign:
In Toonboom Animate the 4 column types I can add are drawing, 3D path, Bezier Curve and Ease Curve.

Honestly, I'm just going to have to give using the xsheet a try and see if it benefits my work flow! You should do the same. I would say that it's the most beneficial to teams of artists in a studio that have to share files or communicate to each other within a scene and want a very sophisticated and organised method to do so. Gotta luv Toonboom for it's awesome professionalism.

Check out some videos demonstrating this information if you like:

Toonboom Tip #25: XSheet Basics (Part 1)

Toonboom Tip #25: XSheet Basics (Part 2)
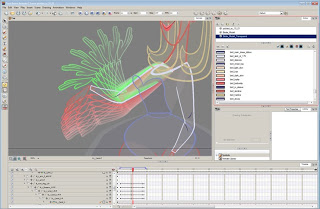
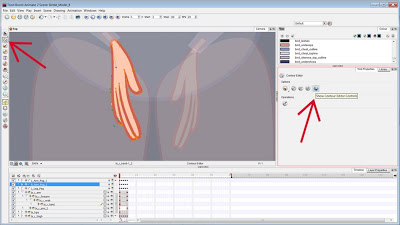
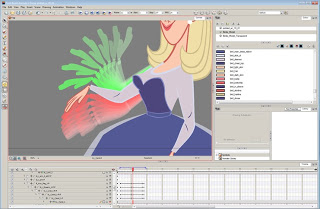
Admittedly, now that I've been using Toonboom to build a few rigs and animate some characters, I realise that the information I'm about to write about here is just about the first thing I should have learned about. I was animating a character and was having difficulty understanding what was going on with the pegs. The first time I started using Toonboom in 2008 I was told to always animate on the peg layers, not the drawings. That was great advice, but it's not like it's got to be that way.

* Don't forget to check out my previous Toonboom Tips on Symbols in Flash vs. Drawings in Toonboom and Symbols vs. Drawings vs. Pegs.

There are multiple ways of doing pivots and multiple layers of pivots:
You may use the pivot tool to set a pivot point on drawing layers. The reason this is useful: When you have a character rig/build and there is for example a hand layer with multiple hands, the pivot point will be correct on all the hands if they overlap in the right spot. But when you swap to a different view, (e.g. from front view to 3/4 front view), and the position of the hand changes, the pivot will be correct for those hands since their pivot is also on the drawing layer. (right?) So, the it's most important to set a pivot on the drawing layer is when you have multiple views on the same timeline.

* Sometimes as an alternative, some people will dodge needing to set drawing level pivots by separating the various views into their own hierarchies. Meaning separate templates for front, 3/4 front, side, 3/4 back, back views.

So, You want to Alter a Single Layer that has a Child that you don't want to Alter?
Now here is some important and valuable information right here. If you set up a basic arm hierarchy, for example, with a hand parented to a forearm and that forearm parented to the upper arm, and the pivots are set properly on each drawing with the pivot tool, you will easily be able to animate the position (e.g. rotation) of each of these drawings, but what happens when you want to skew, squash or stretch a single layer that has a child that you don't want to squash? For example, squashing the forearm but not the hand? You will want to be able to manipulate each piece of the hierarchy separately and individually. This is when pegs come in handy.

So you will want to take those 3 arm elements out of it's hierarchy, then select all 3 drawings and hit on the "add peg" button to add pegs to each drawing layer. So now each drawing layer is outside of a hierarchy. To put it back into a hierarchy, you will want to drag the PEG of the hand to the peg of the forearm, and the peg of the forearm to the peg of the upper arm. Now you have the ability to select the pegs OR the drawing layers and you may squash/stretch/skew on the drawing layer, but animate the position (e.g. rotation) of each element in a hierarchical system via the pegs!

Fixing the Z Depth:
You will have to make sure the Z depth is set properly for each layer. Elements will most likely not be ordered properly at this point. I am using Toonboom Animate so to place an element further away on the Z depth, (for example nudge the hand under the forearm), I'll select that drawing layer and then hit ALT + up. (Conversely, to nudge a layer up, I would hit ATL + down. I basically just remember to hit up when I want down and down when I want up.) AND MAKE SURE THAT THE ANIMATE BUTTON IS OFF WHEN YOU ALTER THE Z DEPTH! This is pretty important. You must make sure your animate button is ON when you're animating and OFF when you're not, otherwise you are going to hate yourself later. (If you're using Animate Pro, you will just need to reorder the connections (compositing order) in the network, very visual and user friendly.)

Making sure the Pivots are Correct Across the Timeline of your Character Build:
You'll notice now that when you select any of the peg layers, the pivot is in the center of your scene and not where you set them on the drawing layer. This is because pegs have their own pivot points. This is where I started my research on setting pivots as I couldn't understand how to edit the pivot on a peg layer. It's not the same as setting a pivot on the drawing layer, (where by you would simply use the edit pivot tool).
So now you have a few options:
1.) leave the peg pivot point where it is and just deal with that
2.) use the rotate tool to set the pivot on a peg layer
3.) use the drawing layers pivot and promote them up to the peg.

Elaboration:

2.) The issue with this method is that if you change the pivot on say, the hand, and you are creating a character turn around, the peg pivot will be changed for all view and it won't be in the right spot. So editing the pivot this way is nice if you don't have multiple positions/views for elements on the same peg. Editing pivots in this manner is going to work if you have created a character with separate templates/hierarchies for each view.

3.) Now if you do want to do multiple views in one timeline, promoting the drawing layer pivot to the peg layer is the way to go. You can open up the layer properties of a drawing layer (or for Pro users click on that layers yellow box on it's nodule in the network) and on the middle drawing tab there is the option for embedded pivots. To apply the drawing layer pivot to the peg of that layer, and select the option to apply the drawing layer pivot to the parent peg. See this video for instructions on doing this and watch from 2:57 to 4:36.

I am going to find a solution for myself in Animate, as I do want to have character rigs with turnarounds that share a timeline. I believe they are more accessible for the animator. When I look back at the first character rig I built, which was of Birdie, I can see that it's sloppy and that it should be fixed up before I start animating with it.

A tip! When you're editing the pivot on the peg layer, make sure that in the layer properties of the peg that the pivot values (bottom two numbers) are set to 0 and 0. Otherwise, when you promote pivots to a peg, the pivot values of a drawing will be added to those numbers. And that will cause your pivot to be offset.

If you want a video and audio demonstration of this information, check out these two videos:

Toonboom Tip of the Week - Pivot Points in Animate, Animate Pro and Harmony - part 1

Toonboom Tip of the Week - Pivot Points in Animate, Animate Pro and Harmony - part 2


This is another post for Toonboom animators! I'm going to keep changing up the type of blog posts I do; some will be more personal, some about my film progress, some tutorials and some reviews. Seems like people are finding the tutorials helpful so I'm going to do more.

I keep re-realising HOW MUCH there is to learn about Toonboom Animate, gah! This past week I started to ponder what symbols were even good for in Toonboom. I have yet to even use a symbol in Toonboom. I did some research and as it turns out, using symbols in Toonboom defeats the benefits Toonboom has to offer! Toonboom implemented symbols into it's software mainly to help make animators with a Flash background feel at home when learning the software. There are a couple occasions they may prove useful but for the most part you shouldn't use symbols in Toonboom. Drawings and pegs are accessible from the main timeline so you never need to click into symbols to access nested animation. There is no concern for the swimmy animation you would get in Flash by not nesting, for example, facial features on a head because you can parent the facial features to the cranium.

ON SYMBOLS:
Symbols in TB are just like symbols in Flash. When a drawing is made into a symbol, you must enter the symbol to edit it. (To enter a symbol you can either double click into it on the stage or right click it in the library and select edit.) Symbols in Flash are extremely useful for things like head compositions (comps) when you want symbols to be parented to a main symbol. There isn't a parenting or hierarchy system in Flash so symbols is a sort of a getaround. Now with Toonboom, there is NO NEED to go into symbols! Everything is accessible from the stage! It's a real timesaver and it's very immediate. Toonboom is great for rigging characters so take advantage of this.

TIP: To go up the hierarchy in Toonboom hit "B" to go down the hierarchy hit "Shift + B". Super useful shortcut!

The time that symbols are useful in Toonboom is when you have an element that is an animated cycle and for elements that you want to update all at the same time. For example if you had 4 wheels on a car and all the wheels were the same, you could make one wheel symbol and place it where you need without having to create new drawings. And that way, if you make a change to one of the wheels, the changes will apply to all of the wheels.

It's very easy to add a new drawing on the timeline. Turn on the timeline view for easy access and visual representation of buttons such as duplicate drawing or create empty drawing. Do this by going to the Toolbar menu and then selecting Timeline View.

Instead of making a symbol of a character so that you may access it from new scenes, you need to make a master template. Action templates are a whole other thing and those are good for saving drawings or animation that you want to reuse. I may put together a blog post in the future on Master Templates and Action Templates but if you need more information right now, please watch this video on Master Templates and this video on Action Templates.

Now, if you did make a symbol with embedded layers, the pivot point on the outside of that symbol is going to be the pivot point of one of the symbols within. If you decide which layer within your symbol is the main layer, for example the body of a car; there is an easy way to set the pivot for that piece inside and outside the symbol! Set the pivot on the main layer within your symbol, then use the option Copy Pivot to Parent Symbol on the Tool Properties Menu.

Holding CTRL while bringing a symbol onto the stage will bring up the paste special menu. From here you may choose whether to:
-paste all frames in the symbol (great if there is animation within a symbol)
-choose how many times a symbols animation cycles
-create a cycle

Symbols are local only to the current scene! If you want to access symbols from other scenes you need to make a template.

Here are some videos with a more in depth and visual explanation of symbols in Toonboom:

Toonboom Tip of the Week - Symbols (Part 1) - VIDEO

Toonboom Tip of the Week - Symbols (Part 2) - VIDEO


ON DRAWINGS:
In Toonboom Animate, drawings and keyframes are separate items. You can manipulate the exposure of the drawings independently from the position of keyframes. When you extend the exposure of a drawing it is represented by a grey block in the Timeline view. When you expose a second drawing, a second grey block is displayed. To animate the position of drawings you will do so with keyframes. Keyframes appear as black squares on the timeline.
ON PEGS:
A peg is something you attach (hook) drawings to so that you may edit your drawings. A perfect example of this is creating a master peg for your character rig and every element of your character will be hooked to the master peg. You can then use the master peg to place you character in a scene and resize it. An interesting way to think of pegs is that they act similarly to the "edit all" button in Flash. When you can edit just the peg to affect the size and position of elements attached to it, this is easy to modify and control.
Posted
AuthorAndrea K Haid
Something a little different this week; a tutorial on creating drawings in Toonboom vs creating symbols in Flash! This simple tutorial will be especially useful for anyone just getting into Toonboom whether they have previous experience with Flash or not. Creating a new drawing in the Toonboom library is the equivalent to making a new symbol or instance in Flash.

Here is a screengrab of my Toonboom set up. I've got the drawing named "bi_r_hand" selected and you can see that on the stage by the orange bounding box around the hand, on the timeline as the selected drawing is highlighted and in the library as instance 1_1 is selected of drawing 1_1.
Now if you right click on the drawing in the timeline, a menu will pop up. Go to Drawings and then pick how you want to create a new drawing. You can either create an empty drawing or duplicate the one you've got selected (Alt+Shift+D) which is what I'm going to do this time.
When I selected duplicate drawing, a new drawing instance called 1_2 was created in the library with the same artwork.
Now I'm going to edit the new drawing using the Contour Editor (white arrow) found in the Tools Toolbar. (A sidenote on shortcuts; they are important!!! They save time! My shortcuts are set to Adobe Flash which is useful to me since I go between Toonboom and Flash regularly and switching between shortcut setups can be a real mindfuck. Since these shortcuts mimic the shortcuts in Flash, I don`t have to memorise a whole new set of keyboard shortcuts for the same tools. The shortcut for the Contour Editor in Flash is "A" and when set to Flash style shortcuts in Toonboom, it's Alt+A. The regular Toonboom Animate Shortcut for the Contour Editor is Alt+Q.) Toonboom has a few really amazing contour editing tools that Flash doesn't. For example the Show Contour Editor Controls button in the Tool Properties menu. If you select this tool, you can move it around the stage and rotate or scale selected pivot points. It will appear like a blue bounding box. If you want to create new points on the drawing, hold control while hovering over a contour and then click.
Now I'm done editing the drawing. (I moved the pinky finger out.) The instance in the drawing (1_2) is visible when the library is open.
Now if you want to show drawing 1_1 again, you move to the spot on the timeline you want that drawing to appear and move the slider back on the library.

Let's take a look at the equivalent for this in Flash. In the screen cap below I've got a Flash file open and I'm on frame 93 of an animation. The front paw symbol is selected and you can see in the Properties tab that it's called "paw" and is set to single frame and instance 2.
On frame one the same symbol is on the same layer but instance 1 is used and still set to single frame.
When you click into the symbol called paw, you can see the two instances back to back on the timeline. Of course it's possible to set frames to single frame or play once, or loop, depending on what you need in the scene. I often use play once to embed animation within a symbol and just make sure that the frames on the outside of that symbol have the right instance set. This function is extremely useful, especially for face compositions (comps) or hands.
Let me know if you have any burning Flash or Toonboom (or hand drawn) animation questions! I'd be happy to post more tutorials in the future if people find them helpful. This one was inspired by Jay Edry.

An extra note: Particularly for TV and film productions, it is useful when using Flash to add new symbols to a file by embedding them inside master symbols set graphic and single frame. (For example with hand or face symbols.) Using symbols set to movie clip in a film production is more or less a no-no, however they are often useful for web animations. More often than not though, I use graphics whenever I can in any Flash animation. Keeping the timeline and library clean and easy to navigate are of utmost importance for the efficient animator, especially when sharing files. I currently work at a game studio and I've had to access other animator's Flash files that were animated a couple years ago. When the animators created those files, they did not dream that their files would be opened up again and reauthored or tweaked. But it's best to always assume that your work can and will be opened up by another artist at a later date.

Happy Digital Animating!
Posted
AuthorAndrea K Haid