Admittedly, now that I've been using Toonboom to build a few rigs and animate some characters, I realise that the information I'm about to write about here is just about the first thing I should have learned about. I was animating a character and was having difficulty understanding what was going on with the pegs. The first time I started using Toonboom in 2008 I was told to always animate on the peg layers, not the drawings. That was great advice, but it's not like it's got to be that way.

* Don't forget to check out my previous Toonboom Tips on Symbols in Flash vs. Drawings in Toonboom and Symbols vs. Drawings vs. Pegs.

There are multiple ways of doing pivots and multiple layers of pivots:
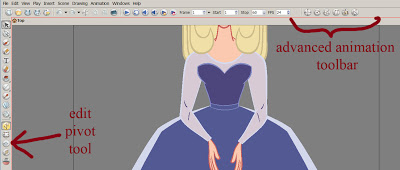
You may use the pivot tool to set a pivot point on drawing layers. The reason this is useful: When you have a character rig/build and there is for example a hand layer with multiple hands, the pivot point will be correct on all the hands if they overlap in the right spot. But when you swap to a different view, (e.g. from front view to 3/4 front view), and the position of the hand changes, the pivot will be correct for those hands since their pivot is also on the drawing layer. (right?) So, the it's most important to set a pivot on the drawing layer is when you have multiple views on the same timeline.

* Sometimes as an alternative, some people will dodge needing to set drawing level pivots by separating the various views into their own hierarchies. Meaning separate templates for front, 3/4 front, side, 3/4 back, back views.

So, You want to Alter a Single Layer that has a Child that you don't want to Alter?
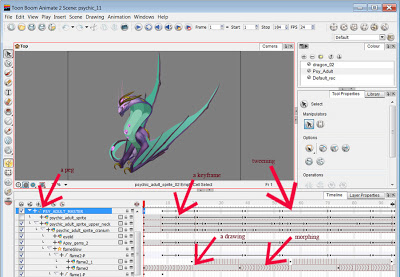
Now here is some important and valuable information right here. If you set up a basic arm hierarchy, for example, with a hand parented to a forearm and that forearm parented to the upper arm, and the pivots are set properly on each drawing with the pivot tool, you will easily be able to animate the position (e.g. rotation) of each of these drawings, but what happens when you want to skew, squash or stretch a single layer that has a child that you don't want to squash? For example, squashing the forearm but not the hand? You will want to be able to manipulate each piece of the hierarchy separately and individually. This is when pegs come in handy.

So you will want to take those 3 arm elements out of it's hierarchy, then select all 3 drawings and hit on the "add peg" button to add pegs to each drawing layer. So now each drawing layer is outside of a hierarchy. To put it back into a hierarchy, you will want to drag the PEG of the hand to the peg of the forearm, and the peg of the forearm to the peg of the upper arm. Now you have the ability to select the pegs OR the drawing layers and you may squash/stretch/skew on the drawing layer, but animate the position (e.g. rotation) of each element in a hierarchical system via the pegs!

Fixing the Z Depth:
You will have to make sure the Z depth is set properly for each layer. Elements will most likely not be ordered properly at this point. I am using Toonboom Animate so to place an element further away on the Z depth, (for example nudge the hand under the forearm), I'll select that drawing layer and then hit ALT + up. (Conversely, to nudge a layer up, I would hit ATL + down. I basically just remember to hit up when I want down and down when I want up.) AND MAKE SURE THAT THE ANIMATE BUTTON IS OFF WHEN YOU ALTER THE Z DEPTH! This is pretty important. You must make sure your animate button is ON when you're animating and OFF when you're not, otherwise you are going to hate yourself later. (If you're using Animate Pro, you will just need to reorder the connections (compositing order) in the network, very visual and user friendly.)

Making sure the Pivots are Correct Across the Timeline of your Character Build:
You'll notice now that when you select any of the peg layers, the pivot is in the center of your scene and not where you set them on the drawing layer. This is because pegs have their own pivot points. This is where I started my research on setting pivots as I couldn't understand how to edit the pivot on a peg layer. It's not the same as setting a pivot on the drawing layer, (where by you would simply use the edit pivot tool).
So now you have a few options:
1.) leave the peg pivot point where it is and just deal with that
2.) use the rotate tool to set the pivot on a peg layer
3.) use the drawing layers pivot and promote them up to the peg.

Elaboration:

2.) The issue with this method is that if you change the pivot on say, the hand, and you are creating a character turn around, the peg pivot will be changed for all view and it won't be in the right spot. So editing the pivot this way is nice if you don't have multiple positions/views for elements on the same peg. Editing pivots in this manner is going to work if you have created a character with separate templates/hierarchies for each view.

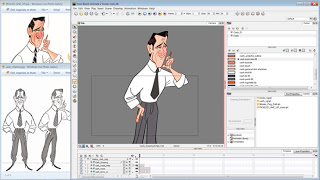
3.) Now if you do want to do multiple views in one timeline, promoting the drawing layer pivot to the peg layer is the way to go. You can open up the layer properties of a drawing layer (or for Pro users click on that layers yellow box on it's nodule in the network) and on the middle drawing tab there is the option for embedded pivots. To apply the drawing layer pivot to the peg of that layer, and select the option to apply the drawing layer pivot to the parent peg. See this video for instructions on doing this and watch from 2:57 to 4:36.

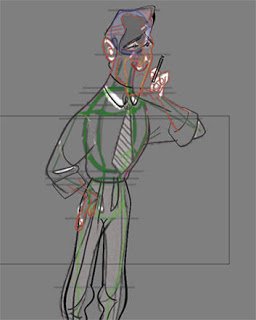
I am going to find a solution for myself in Animate, as I do want to have character rigs with turnarounds that share a timeline. I believe they are more accessible for the animator. When I look back at the first character rig I built, which was of Birdie, I can see that it's sloppy and that it should be fixed up before I start animating with it.

A tip! When you're editing the pivot on the peg layer, make sure that in the layer properties of the peg that the pivot values (bottom two numbers) are set to 0 and 0. Otherwise, when you promote pivots to a peg, the pivot values of a drawing will be added to those numbers. And that will cause your pivot to be offset.

If you want a video and audio demonstration of this information, check out these two videos:

Toonboom Tip of the Week - Pivot Points in Animate, Animate Pro and Harmony - part 1

Toonboom Tip of the Week - Pivot Points in Animate, Animate Pro and Harmony - part 2


One of the reasons I've been too busy to do more artwork on Pickled recently is that for a couple of weeks I used every scrap of spare time I had to work on this hand painted Munny! I've painted it to look like Samus, from Metroid. It was a birthday gift for my husband.
I used this toy as inspiration after I saw Steve write about wanting it on his game company's website. As we're on a budget, spending $200 on a toy was hard to justify. So I decided I would just make one for far less dollars!
I spent about $30 on paint, $6 on Krylon spray, $2 on paint containers, $5 on a brush and $10 on the vinyl toy itself. Then my friend Ania loaned me some of her acrylic paint and brushes. (Thank you Ania!!) If I had bought every colour I needed this project would have been much more expensive.

Here it is, drying off on the fire escape.
Here are a bunch of work in progress photos:
I custom mixed all the paint colours (except black and silver). The paint containers I bought were to hold custom mixed paints so that I could do multiple coats of paint over days.
I finally ripped off the head to add some final touches.
Here it is drying after getting a coat of Krylon Crystal Clear:
Steve likes it! Happy birthday and happy anniversary!

Soon to come... more Pickled art!!!
Posted
AuthorAndrea K Haid
I'm not sure when I first heard about Me and My Shadow; an upcoming animated Dreamworks film. But when I heard about a CG feature with hand drawn elements to play the parts of the character's shadows, I was instantly a fan. What a great idea!!! Here is the poster that's been released by Dreamworks:
This is the only visual to the film that I've seen thus far. The film was first announced in late 2010 but currently it's not to be found on the Dreamworks slate of upcoming films. Though I've read that it's scheduled for a March 2014 release, I'm pretty sure that in reality this film is on hold.

The plot as I understand it: Stanley Grubb is the world's most boring human. His frustrated shadow Stan longs for adventure but is stuck with Stanley, a very timid guy. When a crime takes place in the shadow world which puts both their lives in danger, Stan is forced to break the very rule of shadow land; "they lead, we follow", to take control of Stanley. They go on an adventure to solve this crime and stop the shadow villain from taking over the human world. Along the way some heart warming lessons about life take place as they tend to do. The voice cast currently includes Kate Hudson, (Almost Famous), Josh Gad (The Book of Mormon) and Bill Hader (Cloudy with a Chance of Meatballs). Written by Tom Astle and Matt Ember. Directed by Alessandro Carloni.

What a great idea! Mixing CG and hand drawn animation seems thrilling. The human world will be animated with CG and the shadow world animated with hand drawn animation. There will be incredible flexibility and I believe this mixed medium choice is going to help make a lot of creative descisions. I'd love to see that on the big screen in a feature film format.

I'm pretty excited about the path that Dreamworks is taking with their animated features. The Croods was fantastic. And they've been making a lot of really great films of late. (I loved Megamind too! And How to Train your Dragon!)

A few related links:

What does the future hold for Dreamworks?

Dreamworks drops Me and My Shadow from schedule

First look at Dreamworks Me and My Shadow
It's been another busy week! This past weekend involved a lot of chores and file cleaning. I did find some time to get some painting done on background 26 of the cellar sequence:
This image is super work in progress. I'm going to move the pickle jar. Currently the state this background is in is like the above, but with zoodles of perspective lines all over the place as I get the new jar figured out. I think the visual flow is going to work better with the new version. As I make progress with this one I've been saving it as new versions so that I can whip up a gif of the process.
Posted
AuthorAndrea K Haid
This past Saturday I was at a bit of a loss as to what to do with myself. I recently finished a big task, (I completed my Toonboom Cash rig) and now I've still go so much work left to do on my film; I hardly know where to start! I figured, what with the bit of free time on my plate it was high time I do a little computer cleaning. I've got a couple hard drives... One is somewhat new and I forgot I even owned it. After I bought it I just shoved in a drawer. I have a tradition of naming my hard drives. While trying to think of a name for this new hardrive that's purpose is to store files, it was suggested that I call it "Bag of Holding".
I think Louis Vuitton was inspired by Felix's Magical Bag.

I knew exactly what a Bag of Holding was, but I had never heard that term before! According to Wikipedia, a Bag of Holding is "a fictional magical item in the Dungeons & Dragons roleplaying game, capable of containing obects larger than it's own size. Since it's introduction, it has appeared in other roleplaying games and media." Now, D&D may have coined the term, but it didn't invent the concept of a bag or space that can contain more than it should be capable of. According to tvtropes.org, a Bag of Holding is "a specific portable item which is bigger on the inside than it is on the outside. Much bigger. It may not look it, but that's because it contains Hammer Space. Because the holding capacity of the bag comes from internal Hammer Space, a thoroughly-packed Bag of Holding will weigh no more than a full normal bag. Odds are, it will weigh no more than an empty normal bag".

Upon learning the trope of this concept I thought of Felix the Cat and his Magical Bag of Tricks:

And there's Mary Poppins:

Jessica Rabbit has a Victoria's Secret Compartment to keep anyone from frisking her:

Here's another Victoria's Secret Compartment.

Hammer Space is the space within a Bag of Holding is anywhere that items can be stored and accessed from and where they go back to when not in use. It's common for cartoons and anime/manga characters to pull a hammer seemingly from nowhere to smack another character with. I have always appreciated and accepted Hammer Space. It exists often from behind a person's back or from behind thin things such as trees and lampposts. Even hair can contain Hammer Space. Hammer Space could exist potentially anywhere so long as it is hidden from view before and perhaps while the item (or hammer) is accessed. From within clothing is a common place for Hammer Space.

I appreciate this trope so much because it is a very accepted notion in film and games and it is used for fantastic comedic effect. Cartoons do what real life cannot. Live action film certainly has the power to do as real life cannot but typically more "realistic" expectations are put upon live-action film. When a live-action film acts "cartoony" and allows the impossible to be believed and experienced such as in Kung Fu Hustle, Raising Arizona or Scott Pilgrim Vs. The World; the effect is thrilling.

Some more examples of Hammer Space / Bags of Holding:
Bender's chest compartment (Futurama)
Baby Herman (in Tummy Trouble)  (*see this short at the 1 minute and 46 second mark!)
The Tardis (Dr. Who)
Marge Simpson's hair (The Simpsons)
Ramona Flowers' bag (Scott Pilgrim Vs. the World)
Yakko Warner's bag (Animaniacs)
The Toonboom rig of Cash is DOOOOOONNEEEE!!! Finally! It took 3 weeks of spare time and at least a few full Saturdays to get 'er dun. My goal was to finish it last Friday (April 26) and I ended up finishing it up on Saturday. So, only a day past my goal, not too shabby.
I may just spend a little less time on my film for a little while since I've got a lot on my plate these days. When I'm in the middle of getting something done on my film I find it very difficult to stop thinking about it, (e.g. animating a scene or building a rig). There was a scene that I had started to animate way back when I was still living in Australia and then I had to put it down for 5 or 6 months. That was scary, to come back to a scene and try to be in the moment of it again and remember what the heck I had done so far!

These days I've got a lot going on at my day job, I want to practice using Maya and I want to get back to the gym. (Actually I made it to the gym on Sunday WOO!) I figure that a little bit of exercise on a regular basis will do me a world of good.

Feels fantastic to finally get this sucker done so I can move on!

*EDIT - Just a note... I tweaked this rig after I thought I had finished! So the screen cap above is ever so slightly out of date. I got obsessive over the skin tones and the shape of the ear. I ended up darkening the skins tones slightly and made sure to save all my new swatch data in Photoshop and Toonboom. I have the leisure to obsess since there's no deadline... which can be a danger since I just spend SO much time on getting everything just the way I like. However, it is satisfying :D
Posted
AuthorAndrea K Haid
This is another post for Toonboom animators! I'm going to keep changing up the type of blog posts I do; some will be more personal, some about my film progress, some tutorials and some reviews. Seems like people are finding the tutorials helpful so I'm going to do more.

I keep re-realising HOW MUCH there is to learn about Toonboom Animate, gah! This past week I started to ponder what symbols were even good for in Toonboom. I have yet to even use a symbol in Toonboom. I did some research and as it turns out, using symbols in Toonboom defeats the benefits Toonboom has to offer! Toonboom implemented symbols into it's software mainly to help make animators with a Flash background feel at home when learning the software. There are a couple occasions they may prove useful but for the most part you shouldn't use symbols in Toonboom. Drawings and pegs are accessible from the main timeline so you never need to click into symbols to access nested animation. There is no concern for the swimmy animation you would get in Flash by not nesting, for example, facial features on a head because you can parent the facial features to the cranium.

ON SYMBOLS:
Symbols in TB are just like symbols in Flash. When a drawing is made into a symbol, you must enter the symbol to edit it. (To enter a symbol you can either double click into it on the stage or right click it in the library and select edit.) Symbols in Flash are extremely useful for things like head compositions (comps) when you want symbols to be parented to a main symbol. There isn't a parenting or hierarchy system in Flash so symbols is a sort of a getaround. Now with Toonboom, there is NO NEED to go into symbols! Everything is accessible from the stage! It's a real timesaver and it's very immediate. Toonboom is great for rigging characters so take advantage of this.

TIP: To go up the hierarchy in Toonboom hit "B" to go down the hierarchy hit "Shift + B". Super useful shortcut!

The time that symbols are useful in Toonboom is when you have an element that is an animated cycle and for elements that you want to update all at the same time. For example if you had 4 wheels on a car and all the wheels were the same, you could make one wheel symbol and place it where you need without having to create new drawings. And that way, if you make a change to one of the wheels, the changes will apply to all of the wheels.

It's very easy to add a new drawing on the timeline. Turn on the timeline view for easy access and visual representation of buttons such as duplicate drawing or create empty drawing. Do this by going to the Toolbar menu and then selecting Timeline View.

Instead of making a symbol of a character so that you may access it from new scenes, you need to make a master template. Action templates are a whole other thing and those are good for saving drawings or animation that you want to reuse. I may put together a blog post in the future on Master Templates and Action Templates but if you need more information right now, please watch this video on Master Templates and this video on Action Templates.

Now, if you did make a symbol with embedded layers, the pivot point on the outside of that symbol is going to be the pivot point of one of the symbols within. If you decide which layer within your symbol is the main layer, for example the body of a car; there is an easy way to set the pivot for that piece inside and outside the symbol! Set the pivot on the main layer within your symbol, then use the option Copy Pivot to Parent Symbol on the Tool Properties Menu.

Holding CTRL while bringing a symbol onto the stage will bring up the paste special menu. From here you may choose whether to:
-paste all frames in the symbol (great if there is animation within a symbol)
-choose how many times a symbols animation cycles
-create a cycle

Symbols are local only to the current scene! If you want to access symbols from other scenes you need to make a template.

Here are some videos with a more in depth and visual explanation of symbols in Toonboom:

Toonboom Tip of the Week - Symbols (Part 1) - VIDEO

Toonboom Tip of the Week - Symbols (Part 2) - VIDEO


ON DRAWINGS:
In Toonboom Animate, drawings and keyframes are separate items. You can manipulate the exposure of the drawings independently from the position of keyframes. When you extend the exposure of a drawing it is represented by a grey block in the Timeline view. When you expose a second drawing, a second grey block is displayed. To animate the position of drawings you will do so with keyframes. Keyframes appear as black squares on the timeline.
ON PEGS:
A peg is something you attach (hook) drawings to so that you may edit your drawings. A perfect example of this is creating a master peg for your character rig and every element of your character will be hooked to the master peg. You can then use the master peg to place you character in a scene and resize it. An interesting way to think of pegs is that they act similarly to the "edit all" button in Flash. When you can edit just the peg to affect the size and position of elements attached to it, this is easy to modify and control.
Posted
AuthorAndrea K Haid
I just noticed a recent post on The Rotoscopers blog about some leaked and unfinished animation for Disney's feature; Frozen. It didn't take long for the clip to be pulled from Disney's Greece's youtube page. The look of this film is thrilling! I'm hoping that the final product isn't blue blue blue like some of the concept art appears to be. I'm cool with blue, but I want to see some sumptuous environments that have more going on that snow and sky. One officially released piece of concept art has a lot of this blue going on but from the look of the two screencaps I've posted here, taken from the leaked footage, the film is looking great. There is a bit of a Cinderalla/Sleeping Beauty aesthetic going on, and a some fantastic compositions.
concept art of Anna and Kristoff - love the costume design
screenpcap of leaked footage - elsa in an ice palace?
screenpcap of leaked footage - fantastic environment!

I've been working on my Cash Toonboom rig in my spare time since last Friday but it's not %100 there yet. All the symbols have been created but they need some clean up and paint. So close to being done!! My personal goal was to have it finished today so maybe I can still get there. I can work on it a bit this evening.

Posted
AuthorAndrea K Haid
The walk of a character reveals potentially a great deal about who that character is, how they feel at a particular moment and their situation. Even though a person or character may have a "default walk", they will move differently at different times. If a person is tired or wearing certain clothing or carrying something, they will move differently. I myself recognise that my own walk changes depending on my mood or situation. So if you animate (or act out) a walk, there is great opportunity to reveal information to the audience.

Originally I thought I would use this post to point to a number of walks by characters in high heels. I've picked examples that are entertaining, honest and unique. In my search for examples of great characters in high heels I came across a walk that isn't so high-heeled but is still a great character. That character is Annie Hall, played by Diane Keaton. She isn't really wearing high heels, at best the shoes she wears have a small heel. But her walk and movements are so unique and true. This portrayal couldn't be overlooked. Link to the walk.
The first high heeled walk that popped into my mind for it's exaggerated and comedic quality was that of Peg Bunday acted by Katy Segal from the long running sitcom about a trashy and dysfunctional American family; Married With Children. Link to the walk. *I realise this clip is pretty long, the best walk examples are at 2:13, 3:02, 4:34 and 6:20.
Here is a girl imitating Peg Bundy's walk at Halloween.
Then came to mind the naive and sexy singer/ukelele player/hopeless romantic Sugar Kane Kowalczyk acted by Marilyn Monroe in Some Like it Hot. (Which by the way is a perfect movie.) Link to the walk. Seeing her walk right after seeing Joe as Joesephine and Jerry as Daphne walking in drag is a perfect contrast.
High heels aren't just for girls. Mrs. Doubtfire played by Robin Williams is a unique heel walk example. Mrs. Doubtfire wears "grandma high heels". Williams portrayal of a middle aged man in the middle of a divorce who just wants to see his kids and so disguises himself as a sweet elderly woman housekeeper is super entertaining. This clip is not so much walking but dancing. Link to the walk.
I resisted finding a stack of animated examples of high heeled women. I think looking to real life for study of character is incredibly valuable. (Actually it's important to study LIFE and not simple existing portrayals of characters on film be that in the form or live action or animation.) It's tricky to study animated characters when trying to search out the personality of your own animated character. This happens too often and the acting choices made my animators end up canibalising from other animator's work and therefore not end up as honest portrayals. But I'm going to put Jessica Rabbit on this list since her walk is unforgettabe. Here she is in her famous scene, offering Eddie money to find Roger. Link to the walk.
This clip is of Bart Simpson teaching Lisa to walk in high heels. I couldn't find it in English. Link to the walk.
I think it's easy for an animator to get wrapped up in the technicality of creating a walk. When an animator opens up a digital scene with a character rig it's so easy to just start making keys and diving right in without really doing any planning. When I get a new scene to animate I have learned from experience that it's really a best practice to make some kind of a plan before starting to animate.
I'm happy to have more free time as of late to work on Pickled. Finishing the Cash rig is my new obsession. It would be pretty sweet if I could get this done by next Friday! I'm almost there with the line work. I'll still need to fill in the paint and turn all the artwork into individual drawings. Here's the three quarter front view line work all done:
I recently saw Everything I Can See From Here, a gorgeous and eerie short film by The Line. So much awesome going on in this film. Check out their website; lots of great artwork there and a making of video on the film!
And I recently read about some new rumors of Roger Rabbit films and shorts in the works. Check that out here at The Rotoscopers.
Posted
AuthorAndrea K Haid